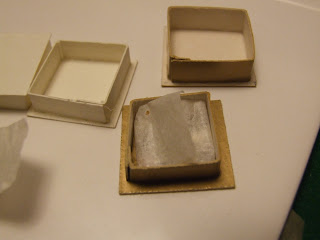


In the comments on the last post today, Marlies asked what the punches were for. Well, there to save me quite a lot of time making Chocolate boxes. I normally measure out, each little square on card and cut it out with a scalpel and metal ruler. The square punch will save so much time. It is a perfect inch by inch.
These little boxes are very simple to make. If you want to make them you will need a sheet of A4 card, either a square punch or scalpel, cutting mat, tacky glue, a small piece of tissue paper, and decorations of your choice, plus some miniature chocolates. You can either make them to open like mine, or sealed if they are just for display purposes.
Firstly, punch or cut out 2 x 1" Squares from card, these will form the lid and the bottom of the box.
Next cut a long strip of card 1/4in wide down the length of the A4 sheet, this will form the insides
of the box. Once the strip is cut, you will need to fold and score it so that it forms a square, leave a tiny overhang so you can glue it together to make a hollow square, this hollow square should fit, slightly inside the bottom of the box. Once your happy with the fit, run a very thin line of tacky glue around the edge and attach it to one of the previously cut squares. Leave to dry.
Next cut another strip the same size, but this time make the hollow square slightly bigger so that it fits over the bottom square. Again one your happy with the fit, glue around the edge and place on the other square. Leave to dry.
Once the box is completely dry, make sure that the lid slips on and off easily.
Next cut a small piece of tissue paper to fit in the bottom of the box, but big enough to come up the sides and be folded over. (See pictures for reference). Again once your happy with the fit, place a tiny bit of glue on the bottom of the box and glue the tissue paper in place. Allow to dry. Once dry add your chocolates, put a tiny dab of glue on the bottom of each chocolate to hold them in place. Then gently fold over the tissue paper. Decorate the top of the box any way you wish, let your imagination run riot. If you want to make a box for decoration only. Just make one hollow square and glue the top and bottom on to it.
Have fun....


.jpg)


.JPG)


11 comments:
So cool Debbie. You are so good and always so sweet to share your talent with everyone. Big hugs for you. Your chocolate boxes are wonderful.
Wow, Debbie, thank you so much for sharing with us how to make these wonderful chocolate boxes! I sure could go for some chocolate right about now, LOL I haven't done much today as I've been cruising through various blogs . . . there's so much eye candy out there! But now back to doll making . . . .
Beautiful boxes, Debbie, hmm chocolate, thank you for sharing how to do! Its verry simple, never tought it.
I was busy, trying to make a blog in English. Its not going verry well yet. And i made 2 tables for my doll'house-shop.
how sweet the boxes and you to teach us. It's ages since I've done chocos but I'll do again soon;oP
Hi Debbie
I love the boxes:) I will try it. Thanks for great pictures.
yep I use punches too :)
Yay for paper punches lol!
Thank you for sharing this Debbie. I'm too bad for mini-paper box making, but I will definitely try it out.
Rachel :)
Gracias Raquel!!!, intentaré hacer uno
un saludo
That is great thank u dear
It's great thank u
That is great thank u dear
Post a Comment