Showing posts with label Chest. Show all posts

Sunday, 25 January 2009

Have You Seen Their Chests..


I thought that title might grab your attention.. I've been trying to catch up with every one's blogs tonight. Gosh and there was a lot to catch up on. Marsha, Marlies and Kewpie were inspired by my Chest Tutorial to make their own. Well I've been and had a look and they look fantastic.
I'm ashamed to say it, but me the instigator of all this mini making haven't finished mine. LOL..
I hope you don't mind girls, but I've borrowed the photo's from your blogs to show every one.
Go and have a look at their blogs, you won't be disappointed.
Marsha at Sassy Mini Dolls.
Marlies at Marlies and Minies.
Kewpie at Miniatures by Kewpie.

Wednesday, 21 January 2009

Making A Chest ... (Part 6)


Well I've managed to do a little more on the Chest. I've starting filling it with Antique Lace, Ribbons, Silks and Cotton materials. I've also made a no sew cushion, to put in there. I'll show you how to make these in a later post. I've also made a little pile of letters and tied them with silk ribbon, ready to pop in there as well.
Please excuse all the mess on my work table, it is on my to do list..LOL.

Monday, 19 January 2009

Making A Chest ... (Part 5)


Last night I did work on the Chest. I found some tiny little luggage printies and stuck a couple to the outside of the Chest. I then got some Burnt Umber acrylic paint and gently dry brushed down the side of the leather straps, and then in between. I want this Chest to look like its been well used.
For the next stage you are going to need, scrap Material, Lace, Ribbon, etc. Try to find contrasting colours. As we are going to fill the chest. We want it to look like the Chest, is filled to overflowing. As you can see I've put one piece of material in already. All I've done is cut a square of material and frayed the edges, this will give the Chest edges a softer look. It has been glued flat inside the chest, but not completely glued down the sides, just here and there to give a draped look. If you click on the pictures it will make them bigger...

Sunday, 18 January 2009

Marlies Trunk..

Marlies just made a comment on my blog. She has been following the Making The Chest, and has made one herself and just posted her pictures on her blog Marlies and Minies. Go and have a look.
Well done Marlies, its looking good, now for the fun part filling it.
I'll be honest I haven't worked on the Chest today, as we've spent ages outside clearing up and doing repairs. Then we had the traditional Sunday Lunch and watched a film late this afternoon. I've just got out of the shower and am lounging in my PJ's. Maybe I get it finished tomorrow....

Saturday, 17 January 2009

Making A Chest ... (Part 4)

For the next stage of the Chest/Trunk, you will need, a piece of cotton material, thin leather or thick card, some stiff card for the inside of the chest, and a small piece of Miniature wallpaper, I found a perfect colour over on one of the printable sites on my Mini Links page. I printed it off on normal printer paper. I then measured the inside of the lid and cut a piece to fit and glued it in place.
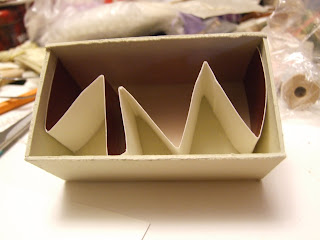
As I want the chest to look like it's overflowing, but not have to fill it all. I took a piece of card,and folded it up like a concertina, to fit in the bottom of the chest, this fills the gap up. I then cut another piece of card to lay over the concertinaed card, leaving approx a 1/4inch gap at the top & glued in place. (Please refer to the pictures).
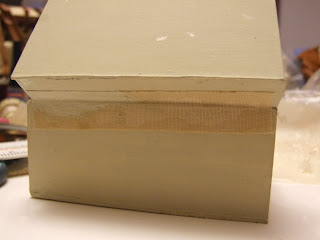
After completing this stage, get the lid and hold it in place as if the lid is nearly open, once you are happy with the placement, run a line of tacky glue along the back bottom edge of the chest and attach the lid, hold in place till the lid dries to the bottom. I wedged a bottle of paint in there to hold it as well. Once you are happy that the lid and bottom are firmly attached, take a piece of cotton fabric and glue this at lid/bottom join on the back of the chest. This is for added support. Once the glue on the material has fully dried, paint over it, in your chosen colour and leave to dry.
While the lid/bottom is drying, get your leather or thick card and cut strips approx 3/8Th's of an inch wide and long enough to go around the bottom of the chest and to go over the top of the chest.
Start at the bottom of the trunk and run a line of glue, then stick your leather/card, completely round the bottom. Then take further strips and stick them at equal distances from each edge on the top of the trunk and down to the bottom. For the two leather straps in the middle leave a little extra leather over hanging, so they look like the straps, that you would do the chest up with. Once you have completed the top, line up some leather/card with the top lines and attach to the bottom of the Trunk..
Tomorrow, if all goes OK here, we will start filling the Chest.
I'm off to bed now....


I'm Back...

Thankfully the wind has dropped, so chanced turning the computer back on. Didn't want to have a power cut mid blog.. LOL. I've been anxiously watching our neighbouring Farmers tree's, they looked like Matchsticks, blowing around in the wind. I was a bit concerned that they might blow down, and come crashing towards our house. But Mick said, that the wind was blowing in the wrong direction and they wouldn't fall our way if they went, but go into his field. Then I got worried as there are two Horses in there.. We won't know what or if any damage has been done to our land and buildings until the morning. So keep your fingers crossed that we've escaped any serious damage.
Our Trampoline escapade, made it on to the local Radio station, how embarrassing is that..! I bet their all be talking about it, in the Village tomorrow.
I have been busy, making the Trunk/Chest.. So will post some more instructions once I've uploaded all the pictures on my computer.. See you soon..

P.S. I had a lovely email this evening from Paco & Anna at Miniaturas del Minimundo de Paco, advising me that my translator, wasn't working correctly. So I've removed it and uploaded another. Lets hope this one works. Please let me know if it doesn't...

Making A Chest ... (Part 3)


The glue has dried on the chest and its quite firm now. I've painted the outside with an Oatmeal colour Acrylic paint, which is currently drying. It helps to fill any little gaps in the card. You can paint your chest any colour you wish.
I'm just deciding what to do next so will be back later with an update...

Question From Marlies Re Chest..


Hi Marlies, thanks for your question on the trunk. The measurements were taken from a real life, full size, travelling trunk that we have at home. I have converted those measurements down to 1/12th scale. Hopefully by the time its finished, it will be filled with lots of goodies.. You can make what every size you wish, if you think its to large, just reduce the size.. Remember I'm making this up as I go along... Hope that's answered your question.. x

Making A Chest ... (Part 2)


To make up your Chest you will need some thick tacky glue and a large pair of scissors. I found as I, was putting the chest together that I needed to trim the side pieces to slide in between the front and back pieces. Remember I'm doing this as I go along... We are making the bottom of the trunk first.
Take one of the large pieces and put it colour side, face down on to your work surface, then take the back piece of card and try a dry fit first, then run a line of tacky glue along the bottom edge of your side piece and place directly on top of the bottom piece. Hold in place until it will stand on it's own, do exactly the same with the other side. Give the glue time to dry, before trying to add the side pieces. Once your pieces are dry, try the sides, you want them to be able to slide in between the back and front and also sit on the bottom piece. This is were the scissors come in handy. I had to trim the sides to fit.. (please see pictures for reference). Leave to dry and then start on the top of your trunk, following the same instructions as for the bottom, again you may have to trim the side pieces.. You should know have a top and bottom of a trunk. Leave them to dry thoroughly..
I'll be back later with the next lot of instructions, once I've done it myself..
We are due severe weather here today, so need to go outside now and make sure everything is secure. Gale force winds are on the way.... Oh Joy..

Friday, 16 January 2009

Making A Chest ... (Part 1)


Now I'm making this up as I go along. I've drawn a scale pattern and cut it out from Mount Board. (This is the board that Artists use to frame their paintings). I've got the pattern, so if you'd like to make one along with me this is what you will need:-
Mount Board in the colour of your choice, mine is Champagne which is a dark cream colour.
A very sharp craft knife to cut the pattern from the Mount Board, please mind your fingers.
A Metal Ruler to cut up against and for measuring your pieces.
You will need to cut:-
2 x 3 and 1/2 inch Length by 2in Width (These will form the top and bottom of your trunk)
2 x 3 and 1/2 inch Length by 1 and 1/2 in width (These will form the front and back of the bottom half of the trunk)
2 x 2in Length by 1 and 1/2 in width ( These will form the end pieces of the bottom half of the trunk)
2 x 3 and 1/2 inch Length x 1/2 width (These will form the front & back side of the top of the trunk)
2 x 2in Length x 1/2 width (These will form the two end pieces of the top of the trunk.

Please refer to the picture for guidance. This is what you should end up with...

Part 2 coming up when I've done it myself... Be back later...
Related Posts with Thumbnails